By Ethan Brooks
Updated November 2026
A homemade solar heater for swimming pool use is a simple black-tubing or panel system that routes pool water through sun-warmed plastic or metal tubing before it returns to the pool. Done right, it can add several degrees to a pool’s temperature during daylight hours and extend your swim season by weeks on either end. This guide walks through how the system works, how to size it to your pool and pump, and how to build and connect it without wasting water or losing pressure.
How a Homemade Solar Pool Heater Works
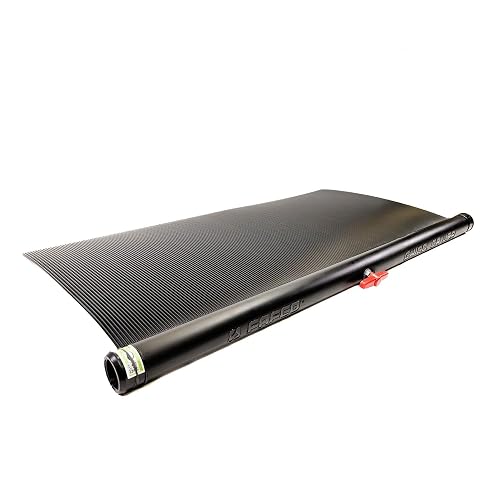
Water circulates from the pool, through a pump, into a collector, and back to the pool. The collector is a series of dark, UV-stable tubes or a flat panel that absorbs sunlight and transfers that heat to the water passing through it. The water never mixes with the air inside the collector, so the principle is a closed water path heated by a sunlit surface.
Shopping for one? See our guide: 6 Best Swimming Pool Heater Solar Options for Every Pool in 2026.
Three variables decide whether your build works: the pump’s flow rate in gallons per minute (GPM), the total head height the pump must lift water against, and the collector’s exposed surface area. Get these three right and the rest is plumbing.
Step 1: Check Your Pump and Filter Flow Rate
Before buying anything, find out how much water your pump moves. Most residential pool pumps are rated in GPM at a specified head. Check the pump label or the manufacturer’s performance curve. Many owners report that real-world flow is lower than the label number once the filter is partly clogged, so measure it if you can: time how long it takes to fill a 5-gallon bucket at the return line, then divide 5 by the minutes elapsed.
A common target for solar collectors is about 1 to 1.5 GPM per square yard of exposed collector area, but do not treat that as a fixed rule. Lower flow gives more heat per gallon but less total heat per hour; higher flow moves more heat but may not reach useful temperatures on cool days. Many builders aim for a moderate flow that keeps the collector outlet noticeably warmer than the pool.
Step 2: Estimate the Head Height
Head is the vertical distance the pump must lift water, plus the friction loss through pipes and fittings. For a roof-mounted collector 12 feet above the pump, the static head is 12 feet. Add friction loss from pipe length and elbows. A 1.5-inch pipe carrying 20 GPM loses only a few feet of head per 100 feet of run, but small-diameter pipe and many fittings add up fast.
Keep the collector as close to the pool’s water level as practical. Every extra foot of lift reduces flow. If your pump’s curve shows low GPM at 15 feet of head, a ground-level collector may outperform a roof mount even with less sun exposure.
Step 3: Size the Collector
A rough sizing approach is to match collector area to pool surface area. Many pool owners aim for collector area roughly equal to 50 to 100 percent of the pool surface area, depending on climate, desired temperature rise and how many hours per day the sun reaches the panels. Warmer climates with long sun hours need less; cooler, shorter-day climates need more.
For more detailed sizing methods, see Solar Pool Heater Sizing: How Many Panels Does Your Pool Need? and Solar Pool Heater Sizing Calculator: How Many Panels Do You Need?, which walk through the math step by step.
Choosing Materials
Most homemade collectors use black polyethylene or PVC tubing, usually 1/2-inch or 3/4-inch diameter, mounted in parallel runs between two manifolds. Black tubing is cheap and widely available, but it must be UV-stabilized for outdoor exposure. Some builders use black-painted metal or rubber mats, but these are harder to plumb and can leak.
Use these materials as a starting checklist:
- UV-stabilized black tubing (1/2-inch or 3/4-inch), sized to your manifold
- PVC pipe and fittings for the header/manifold (1-inch or 1.5-inch)
- Solvent cement and primer rated for PVC
- Mounting frame or brackets rated for wind loads in your area
- Diverter or ball valve for winter drain-down
- Check valve to prevent backflow when the pump is off
- Air release or vacuum relief valve at the high point
- Pressure gauge and a temperature sensor if you want to monitor performance
Step 4: Build the Collector
Lay Out the Manifolds
Mount the inlet and outlet headers level across the collector, with the inlet at the bottom and the outlet at the top so air rises out and the water can drain fully. Space the riser tubes evenly, typically with equal spacing that keeps the flow balanced across all runs.
Attach the Tubing
Connect the riser tubes to the headers using tee fittings or barbed fittings with clamps. Use the same number of tube lengths on each run so pressure drops match. Keep runs as short as practical; long serpentine paths increase friction loss.
Test Before Mounting
Pressure test the assembled collector at low pressure with the pump off and the water source connected. Look for leaks at every joint, then fix them before the panel goes on the roof.
Step 5: Plumb the System
Tie the collector into the pool’s return line, ideally after the filter and before the return jet. Install a diverter valve so you can switch between solar heating and bypass. Place the check valve after the pump to stop water from draining back through the collector when the pump shuts off. For a full plumbing layout, see Solar Pool Heater Plumbing Diagram: Step-by-Step Layout for Beginners.
Install an air release valve at the highest point of the collector. Trapped air reduces flow and can cause the pump to lose prime, so this valve matters more than most first-time builders expect.
Step 6: Set Up Winter Drain-Down and Operation
In freezing climates, the collector must drain completely when temperatures approach freezing. Mount it so it slopes toward the drain point, and use a drain valve or motorized diverter to empty it automatically. Operate the system on sunny days, and bypass it when the collector outlet is cooler than the pool, which can happen on cloudy days or during evening hours.
A solar pool heater is useful only while the sun is working. Owners often report that running the pump through a timer that matches peak sun hours gives better results than running it around the clock.
Common Mistakes
- Undersizing the pipe: small-diameter runs choke flow and can overheat the pump.
- Skipping the air release valve: trapped air causes flow loss and noisy operation.
- Ignoring head height: a collector mounted far above the pool can cut flow sharply.
- Using non-UV-rated tubing: it cracks within a season or two of sun exposure.
- Forgetting winter drain-down: trapped water can freeze and split tubing and fittings.
- Running the pump at night: the collector can cool the pool when there is no sun to heat it.
- Skipping the check valve: the pool can drain back through the collector when the pump stops.
Tips for Better Performance
- Use a dark, matte finish on the collector to improve sun absorption.
- Insulate the return plumbing in cold weather to reduce heat loss.
- Keep the collector clean; dust and pollen reduce absorption noticeably.
- Use a pool cover at night to keep heat from escaping.
- Test flow and temperature rise after each build change to confirm improvements.
Recommended Gear
A few supplies make the build safer and easier to maintain. A reliable check valve prevents backflow, and a diverter valve lets you switch between solar and bypass easily. View on Amazon is a common starting point for the return line. For monitoring, a pool thermometer or digital temperature sensor helps you see whether the collector is actually adding heat. View on Amazon works well for checking inlet and outlet temperatures. Finally, a pressure gauge on the manifold shows when the pump is struggling. View on Amazon is a practical choice.
FAQ
Can a homemade solar heater really warm a pool?
Yes. A well-sized, properly plumbed system can raise pool temperature several degrees on sunny days, though results depend heavily on climate, pool size and collector area.
What size pump do I need?
Your existing pool pump usually works if it can move enough water through the collector. Measure real flow rate and check the pump curve for the head height you plan to use.
How much collector area do I need?
Many builders aim for collector area roughly equal to 50 to 100 percent of pool surface area, adjusted for climate and sun hours. See Solar Pool Heater Sizing: How Many Panels Does Your Pool Need? for details.
Do I need a diverter valve?
It is strongly recommended. A diverter lets you bypass the collector on cloudy days or at night, and it makes winter drain-down simpler.
What tubing should I use?
Use UV-stabilized black polyethylene or PVC tubing rated for outdoor exposure and your water temperature.
Does a homemade system need a permit?
Requirements vary by location. Check local building and plumbing codes before installing a roof-mounted system or connecting to your pool plumbing.
Is a DIY solar heater safe to connect to my pool?
Plumbing connections should be made carefully with proper valves and check valves to prevent backflow. If you are unsure about electrical or plumbing work, consult a licensed professional.
How do I know if it is working?
Compare the temperature at the collector outlet with the pool temperature on a sunny afternoon. A consistent rise of several degrees indicates the system is adding heat.
Conclusion
A homemade solar heater for swimming pool use is achievable with careful planning around flow rate, head height and collector sizing. Start by measuring your pump, estimate the lift, and size the collector to your pool and climate. Build it with UV-rated materials, plumb in proper valves, and plan for winter drain-down. With those basics in place, the system can extend your swim season and reduce how often your main heater runs.
Related reading
- Top 7 Swimming Pool Solar Water Heater Options Compareds (2026)
- 7 Best Inground Swimming Pool Solar Heaters for Every Pool Size (2026)
Ready to choose one?
About Ethan Brooks
Ethan Brooks is part of our editorial team and reviews and edits our solar water systems guides, checking product details against manufacturer specifications and owner feedback.