By Ethan Brooks
Updated November 2026
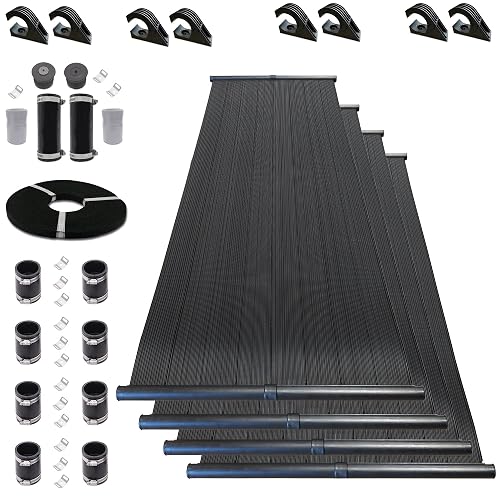
A DIY solar panel pool heater uses black polymer or metal absorber panels, a pump and a set of plumbing and controls to move pool water through the sun and back into the pool a few degrees warmer. Done right, a homemade system can add meaningful heat to an above-ground or inground pool during the warm months, and it can do so for a fraction of what a finished commercial kit would run. This guide walks through the decisions that determine whether your build works: sizing the collector area, matching flow to panel requirements, plumbing layout, controls and the mistakes that most often leave builders with a pool that stays stubbornly cool.
How a Solar Pool Heater Works
Pool water is pulled from the filter return or a dedicated line, pushed through a set of unglazed collector panels where it absorbs heat from the sun, and sent back to the pool. Unlike a flat-plate solar water heater for a house, a pool system does not store hot water in a tank. The pool itself is the storage, which means the system only needs to deliver a steady temperature rise while the sun is up.
Shopping for one? See our guide: Solar Pool Heater Install: 3 Best Panels for Above-Ground Pools (2026).
Three things control performance: the amount of collector area exposed to sun, the volume of water flowing through the panels per hour, and the head pressure the pump must overcome. If any one of these is badly matched to the others, the system underperforms no matter how good the panels are.
Step 1: Size Your Collector Area
Most pool heating guidance is expressed as a ratio of collector area to pool surface area. For a typical climate, a common starting point is roughly 50 to 100 percent of pool surface area in collectors for a pool you want to heat through the season, with the lower end suiting warm regions and the higher end suiting cooler ones or pools you want to use early and late in the year. Cover-on operation and wind exposure will shift that number.
For a rough example, a 15 by 30 foot pool has 450 square feet of surface. At 75 percent coverage you would target about 340 square feet of collector area. If your panels are 4 by 10 feet (40 square feet each), that works out to roughly nine panels. For a more exact figure, see our guide to Solar Pool Heater Sizing: How Many Panels Does Your Pool Need? and the Solar Pool Heater Sizing Calculator: How Many Panels Do You Need? article, which walk through the same math with climate adjustments.
Step 2: Match Flow Rate to the Panels
Unglazed polymer panels perform best at moderate flow. Many sources recommend roughly 2 to 3 gallons per minute per square meter of collector area, though manufacturers of specific panel products publish their own targets and you should follow those when they exist. Too little flow and the water overheats inside the panel and loses efficiency; too much and it passes through too fast to pick up heat.
| Collector area | Approximate flow range (gpm) | Pump type to consider |
|---|---|---|
| 200 sq ft | 20 to 30 | Small single-speed pump, or variable-speed set low |
| 350 sq ft | 35 to 55 | Standard single-speed pool pump, dedicated loop |
| 500 sq ft | 50 to 75 | Higher-flow pump or variable-speed unit |
Check your pump curve. Head pressure from the roof or elevated panel mount, plus friction loss through pipe and fittings, determines actual flow. A pump rated for 60 gpm at zero head might deliver only 35 gpm at 20 feet of head.
Step 3: Plan the Plumbing Layout
A reliable layout follows the same logic as any closed hydronic loop. Water enters the panels at the lowest header, flows up through the risers in parallel, and exits at the top header back toward the pool. Using balanced headers (reverse-return or equal-length piping) prevents short-circuiting, where water takes the easiest path and some panels run cold.
Essential components
- Collector panels with headers sized for your flow
- A pump rated for the calculated flow and head
- Check valve to prevent backflow at night
- Automatic or manual diverter valve to bypass the heater when it is not needed
- Vacuum relief valve at the highest point to release trapped air and prevent the panels from pulling a vacuum
- Drain-down valves so the panels can empty before freezing weather
- Temperature sensor on the panel outlet and the pool return
Mounting and slope
Mount panels to face the equator at an angle close to your latitude for year-round use, or a few degrees lower for summer-focused heating. Slope the piping so that water drains toward the drain-down point. Flat runs trap air, so give every horizontal section a gentle fall.
Step 4: Controls and Automation
Without controls, a pool heater will either run when it should not or never shut off. A basic differential controller compares panel temperature with pool temperature and switches the diverter valve and pump only when the panels are warmer than the water by a set margin, commonly a few degrees. This prevents the system from cooling the pool at night or on cloudy days.
Freeze protection matters wherever temperatures drop below freezing. Either drain the system manually each fall or use an automatic drain-down valve that opens when sensors read near-freezing conditions.
Step 5: Install and Test
- Assemble the panels on the mounting frame, checking that all header connections are sealed and flat.
- Run supply and return lines to the pool, keeping pipe diameter consistent with your flow target.
- Install the check valve, diverter valve and vacuum relief at the correct points.
- Pressure-test with water before insulating or connecting the pool side.
- Run the pump for an hour in full sun and measure inlet and outlet temperatures at the panels. A healthy system shows a clear rise, often several degrees on a good day.
- Adjust flow with a ball valve until the outlet runs warm but not scalding.
Tools and Materials Checklist
- Collector panels (polymer or metal absorber, matched to your area target)
- PVC or CPVC pipe and fittings sized for your flow
- Solvent cement and primer appropriate for your pipe
- Pump with rated flow and head data
- Check valve, diverter valve, vacuum relief and drain-down valves
- Temperature sensors and a differential controller
- Mounting brackets, straps and roof-safe fasteners
- Pressure gauge and a flow meter or bucket-and-timer test
Common Mistakes
- Undersizing the collector area. Builders often add a few panels to stretch the budget, then wonder why the pool barely warms.
- Ignoring head loss. Long pipe runs and high mounts cut flow sharply. Calculate total dynamic head before buying the pump.
- Skipping the vacuum relief. Without it, the panels can drain or draw air into the pump, causing cavitation and noise.
- Running the heater at night. Without a differential controller, the pool loses heat through the panels after sunset.
- Forgetting freeze protection. Trapped water expands and cracks headers. Drain or protect the system before the first hard freeze.
- Unbalanced headers. Panels near the inlet run hot while those at the far end stay cool. Use reverse-return piping.
- Undersized pipe. Narrow lines create pressure drop that the pump cannot overcome, leaving you with a fraction of the flow you designed for.
Recommended gear
A variable-speed pump lets you fine-tune flow to match your panel area and head, which is especially useful for DIY builds where calculations are approximate. View on Amazon
A differential temperature controller with two sensors automates the switching between heating and bypass, so the system only runs when it adds heat. View on Amazon
Automatic air relief and vacuum breaker valves protect the panels and pump from trapped air and negative pressure. View on Amazon
For a closer look at how the parts connect, the Solar Pool Heater Plumbing Diagram: Step-by-Step Layout for Beginners and Solar Pool Heater Diagram: How the Parts Connect and Flow (2026) articles are useful companions. If you want to see a homemade approach from start to finish, Making a Solar Pool Heater: A Step-by-Step DIY Guide with Flow and Sizing Tips covers a similar build. For the valve question specifically, What Is a Solar Pool Heater Vacuum Breaker and Why Does It Matter? explains the function in more depth.
Tips for Better Results
- Start with the flow target, then choose pipe and pump to meet it rather than the other way around.
- Use a pool cover at night. It can cut evening heat loss significantly and keeps the pool warmer for the next day’s heating cycle.
- Mount panels where they receive unshaded sun from late morning through mid-afternoon.
- Keep a log of inlet and outlet temperatures for a few sunny days. It tells you quickly whether flow or area needs adjusting.
- Check the pump strainer and panel inlet for debris; leaves and grit reduce flow over time.
FAQ
How many solar panels do I need for a DIY pool heater?
Many builders target roughly 50 to 100 percent of pool surface area in collector panels, with the exact figure depending on climate, wind, and whether you use a cover. Calculate your pool area in square feet, pick a target percentage, then divide by the area of the panel you plan to use.
Do I need a special pump for solar pool heating?
Not always, but the pump must deliver the flow your panels need at the head pressure your layout creates. A standard single-speed pool pump often works for small systems, while variable-speed pumps give more control over flow for larger or more complex builds.
Can I use PVC pipe for the panels?
Yes. PVC is common for pool systems because it resists chlorinated water. Use pipe rated for your water temperature and pressure, and follow the solvent cement manufacturer’s instructions for joints.
Why is my solar pool heater not warming the pool much?
The most common causes are undersized collector area, flow that is too high or too low, air trapped in the panels, or a controller that switches the system off too often. Measure inlet and outlet temperatures to narrow down the problem.
Should I run the heater overnight?
Generally no. Panels cool quickly after sunset and can pull heat out of the pool. A differential controller or manual diverter valve keeps the system from running when panels are colder than the water.
How do I protect the system from freezing?
Drain the panels and lines before freezing weather, or install automatic drain-down valves that open when temperatures approach freezing. Make sure all low points drain completely.
Do I need a permit for a DIY pool heater?
Requirements vary by location. Some jurisdictions require permits for roof-mounted systems or for connections to pool equipment. Check with your local building department, and consult a licensed professional for electrical work or roof structural questions.
Is a DIY solar pool heater as effective as a commercial kit?
It can be, provided the sizing, flow, plumbing and controls are done correctly. Commercial kits are engineered to a tested specification, so a DIY build requires more careful calculation and verification.
Conclusion
A DIY solar panel pool heater is a practical project when you treat it as a hydraulic system rather than a pile of panels. Size the collector area to your pool, match flow to the panels and head, plumb with balanced headers and include vacuum relief, controls and freeze protection. Measure temperatures during the first few sunny days and adjust flow until the system performs as expected. Consult a professional for electrical work or roof-mounting questions.
Related reading
- Solar Pool Heater Sizing: How Many Panels Does Your Pool Need?
- Solar Pool Heater Sizing Calculator: How Many Panels Do You Need?
- Making a Solar Pool Heater: A Step-by-Step DIY Guide with Flow and Sizing Tips
- 6 Best Solar Heaters for Pool DIY Options for 2026
- 6 Best DIY Swimming Pool Solar Heater Options for Every Pool in 2026
- 5 Best Solar Pool Heater Panel Options for Every Pool Size (2026)
Ready to choose one?
About Ethan Brooks
Ethan Brooks is part of our editorial team and reviews and edits our solar water systems guides, checking product details against manufacturer specifications and owner feedback.