By Ethan Brooks
Updated November 2026
Learning how to build a pool solar heater comes down to three things: matching collector area to your pool, moving enough water through the panels, and plumbing the loop so the warm water actually returns to the pool. This guide walks you through each of those steps, with the flow rate and head height numbers you need to size a working system. By the end, you will have a clear plan for a DIY unrigid-panel heater built from standard supplies.
How a Solar Pool Heater Works
A solar pool heater is a simple loop. A pump pulls pool water through the collector panels, where sunlight warms it, and the heated water returns to the pool. Unlike a solar water heater for a house, there is no storage tank and no need to pressurize the water, because the pool filter pump already supplies the flow. The panels are usually black polymer tubes or mats, which absorb sunlight well and tolerate pool chemistry.
Shopping for one? See our guide: Top 5 Solar Water Pool Heater Options Compared for 2026.
Because the water passes through once and goes back to the pool, the system works best when the pool stays in the sun for most of the day. Expect the heater to add a few degrees of warmth per sunny day rather than turning a cold pool into a hot tub overnight.
Step 1: Size the Collector Area
Collector area is the first number to get right. A common rule of thumb is that unglazed solar collectors need roughly 50 to 100 percent of the pool’s surface area, depending on how warm you want the water and how much sun your site gets. A pool in a hot, sunny climate can use the low end of that range, while a cooler or shadier site generally needs more collector area.
For example, a 16 by 32 foot pool has about 512 square feet of surface. At 50 percent coverage you would want about 256 square feet of collector; at 100 percent, about 512 square feet. Panels are typically sold in 4 by 10 or 4 by 20 foot sections, so you can count the panels you need once you know the target area.
For a more detailed breakdown, see Solar Pool Heater Sizing: How Many Panels Does Your Pool Need? and Solar Pool Heater Sizing Calculator: How Many Panels Do You Need?.
Step 2: Calculate Flow Rate and Pump Head
Once you know the collector area, choose a flow rate. Most unglazed systems perform well at roughly 1 to 1.5 gallons per minute per square foot of collector, though many installers aim for the lower end to keep water in the panels long enough to heat. A 256 square foot array might run at 100 to 150 gallons per minute depending on your target temperature rise.
Head height is the vertical distance from the pool water level to the highest point of the panels, plus friction loss in the pipe. Keep the panels as close to pool level as possible. Every extra foot of lift reduces flow. Check your pump’s performance curve, which manufacturers publish, to confirm it delivers your target gallons per minute at your total head.
Quick Sizing Reference
| Pool Surface (sq ft) | Suggested Collector Area (50 to 100%) | Typical Flow Target (GPM) |
|---|---|---|
| 300 | 150 to 300 sq ft | 75 to 150 |
| 512 | 256 to 512 sq ft | 128 to 256 |
| 800 | 400 to 800 sq ft | 200 to 400 |
These are planning figures. Confirm the final flow with your actual panel layout and pump curve.
Step 3: Gather Materials and Tools
A basic DIY build uses the following supplies. Check local codes and your pool equipment’s warranty before you cut into any existing plumbing.
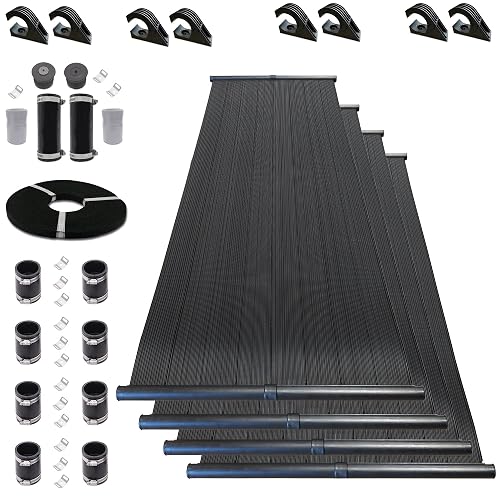
- Black polymer or PVC solar collector panels, sized to your calculated area
- Supply and return PVC pipe, usually 2 inch, plus fittings and unions
- A dedicated pump or a bypass valve to route water from the filter to the panels
- A check valve to stop backflow when the pump is off
- A vacuum relief valve, which protects the system from drawing a vacuum on the pump
- A temperature sensor and a three-way or automatic diverter valve, if you want automatic control
- PVC primer, cement, pipe straps, and a mounting frame or stakes
- Pipe cutter, deburring tool, tape measure, level, and a bucket for draining
Some builders use a float or dome to vent air from the panels, which helps during startup. For how these parts work together, see Solar Pool Heater Diagram: How the Parts Connect and Flow (2026) and Solar Pool Heater Float: What It Does and How to Use One Right.
Step 4: Mount the Panels
Mount the panels on a flat roof, a ground rack, or a south-facing slope in the Northern Hemisphere, with a slight tilt to help drainage. Panels should sit as level as possible so water distributes evenly across the header tubes. Anchor the frame against wind, since loose panels can shift or crack. If the array is on a roof, confirm that the structure can carry the added water weight.
Keep the lowest point of the array as close to the pool as practical. This reduces head height and keeps the pump working efficiently.
Step 5: Plumb the Loop
- Tap into the filter return line or install a bypass valve ahead of the filter. Water should pass through the filter first to keep debris out of the panels.
- Run supply pipe from the pump to the inlet header at the bottom of the array. Keep the run short and use long-sweep elbows to limit friction loss.
- Connect the outlet header at the top of the array to a return line that feeds back to the pool.
- Install a check valve and a vacuum relief valve at the highest practical point, following the manufacturer’s orientation.
- Add a temperature sensor at the pool or the panel outlet if you want automatic switching.
- Pressure test the system with the pump off and the panels drained before you fill and run it.
The reason this loop works so simply is that the existing pool pump supplies all the flow. Once the pump runs, water moves through the panels, heats up, and returns, with no extra pressure vessel or storage tank needed.
Step 6: Control and Operate the System
Run the heater during the warmest part of the day, usually late morning to late afternoon. A manual diverter lets you switch between pool filtration and solar heating. An automatic diverter with a temperature sensor sends water to the panels only when the collectors are warmer than the pool, which avoids cooling the pool at night. Many owners report that automatic control saves them from forgetting to switch modes.
When you first start the system, bleed air from the highest point of the panels. Trapped air reduces flow and can cause the pump to run dry. Once water flows steadily, watch the return temperature for a few sunny afternoons to see how much heat the array is adding.
Common Mistakes
- Undersizing the panels. A small array looks cheap on paper but rarely raises the pool temperature enough to notice.
- Ignoring head height. Panels mounted high above the pool can cut flow sharply. Check the pump curve before you finalize the layout.
- Skipping the vacuum relief valve. Without it, the pump can pull a vacuum on the panels and lose prime.
- Running the heater at night. Without automatic control, the pool can lose heat through the panels after sunset.
- Using the wrong pipe or glue. Confirm that PVC and cement are rated for your water temperature and chemistry.
- Forgetting to drain for winter. Panels that freeze and split are expensive to fix. In freezing climates, drain the array or use a winterization approach recommended by your manufacturer.
Tips for Better Performance
- Use a pool cover at night to hold heat in the water. This often improves results more than adding panels.
- Keep the panels clean and free of leaves, since debris blocks sunlight and can clog the tubes.
- Check the pump’s flow rate with a flow meter or by timing a known volume of water into a bucket.
- Compare your layout against Solar Power for Pool Heater: How to Size, Set Up and Avoid Mistakes to catch sizing problems early.
- If you want a ready-made option to compare against your build, read DIY Solar Panel Pool Heater: Build One That Actually Heats Your Pool for a different approach.
Recommended gear
A flow meter helps you confirm that your pump delivers the gallons per minute your sizing calls for, which is the single most useful check after installation.
A vacuum relief valve protects the pump from drawing a vacuum on the panels when the system shuts off or loses water.
A three-way diverter valve lets you switch cleanly between filtration and solar heating without rerouting pipe by hand.
FAQ
Can I really build a pool solar heater myself?
Yes, many homeowners build a basic unglazed system using standard PVC and polymer panels. The work is mostly sizing, plumbing and mounting. If your pool is attached to a gas heater or you are unsure about electrical controls, consult a professional pool contractor.
How many panels do I need for my pool?
A common planning range is 50 to 100 percent of the pool’s surface area as collector area. The right number depends on climate, sun exposure and how warm you want the water to get.
What flow rate should a DIY solar pool heater have?
Many unglazed systems run at roughly 1 to 1.5 gallons per minute per square foot of collector. Check your pump’s performance curve to confirm it delivers that flow at your actual head height.
Do I need a separate pump for solar heating?
Usually not. Most systems use the existing pool filter pump, which is why keeping head height low matters. A dedicated pump may be needed if your existing pump cannot deliver enough flow at your layout.
Why is my solar heater not warming the pool?
Common causes include undersized panels, air trapped in the array, high head height reducing flow, debris blocking the tubes, or the system running when the panels are cooler than the pool.
Should I use an automatic diverter?
An automatic diverter with a temperature sensor is helpful because it sends water to the panels only when they are warmer than the pool. Manual switching works but requires more attention.
Can I use a solar pool heater in winter?
In mild climates, yes, though output drops with lower sun and colder air. In freezing climates, drain the panels or follow the manufacturer’s winterization steps to prevent freeze damage.
Conclusion
Building a pool solar heater is a practical project when you size the collector area correctly, match the flow rate to your pump, and keep head height low. Plumb the loop so water filters first, add a vacuum relief valve, and control the system so it runs only when the panels are warmer than the pool. Start with the sizing numbers in this guide, and check your layout against the pump curve before you commit to the build.
Ready to choose one?
About Ethan Brooks
Ethan Brooks is part of our editorial team and reviews and edits our solar water systems guides, checking product details against manufacturer specifications and owner feedback.